Thursday, August 4, 2011

Dr. Seuss' Thing 1 & Thing 2 Shirts

We are headed to Florida soon for a vacation, and we have decided to visit Universal Studios this year. We have been to Disney the past 2 years, and the hubs and I are kinda wanting to mix things up a bit. The kids have no idea we are going there. They think it's JUST a beach trip...:o)
 If you have been following me for a while, you know that I did a whole ensemble for the kids to wear to Disney.
To see those outfits, you can go Here, Here, Here, &  Here.
We are planning to go to Universal  for only 2 days, so I only need 2 outfits:o)
Here is the first matching outfit:
To make these super easy and super cute shirts, here is a list of supplies you will need:
Red t-shirt
White tee or white stretchy fabric
Light Fabric Transfers(found at any craft store or Walmart)
Heat Bond...I prefer the kind that you can sew on.
scissors
iron
thread 
sewing machine
 Start out by washing and drying your tees. That is to ensure that your shirts don't shrink, or the transfers do not bleed through the fabric. Cut your white tee in half. I made sure to iron any wrinkles out, so as to have a smooth look with the steam OFF.
 After printing the decals out onto your heat transfer paper...using the mirror image function...lay them out on the heat bond to see how much you will need. 

 Lay the heat bond stick'em side down on the inside of the tee, and iron in place. Let cool.
 Lay your decal face down and trace around the edges on the heat bond backing. I turned the decal face down so that I wouldn't accidentally draw on the decal:o) Cut around the edges.
 And it should look a little something like this.
 Now get your red tee. Pull the backing off of the heat bonded circle.
 Center it on the tee with the stick'em side down.
 Now lay your decal over the circle making sure that the letters are lined up and not tilted to the side.
Iron for about 45 seconds, making sure to press down hard. The instructions on the transfers say to NOT use an ironing board. I laid some scrap fabric under the tee to give it a little cushion. 
 Let the shirt sit for 2 minutes and then remove the backing. For added stability, I sewed around the black line.
 And there you have it:o) Very easy, and very Universal Studios ready
If you would like to make these cute shirts just click below to download the files!!
and


Dr. Seuss' Thing 1 & Thing 2 Shirts

We are headed to Florida soon for a vacation, and we have decided to visit Universal Studios this year. We have been to Disney the past 2 years, and the hubs and I are kinda wanting to mix things up a bit. The kids have no idea we are going there. They think it's JUST a beach trip...:o)
 If you have been following me for a while, you know that I did a whole ensemble for the kids to wear to Disney.
To see those outfits, you can go Here, Here, Here, &  Here.
We are planning to go to Universal  for only 2 days, so I only need 2 outfits:o)
Here is the first matching outfit:
To make these super easy and super cute shirts, here is a list of supplies you will need:
Red t-shirt
White tee or white stretchy fabric
Light Fabric Transfers(found at any craft store or Walmart)
Heat Bond...I prefer the kind that you can sew on.
scissors
iron
thread 
sewing machine
 Start out by washing and drying your tees. That is to ensure that your shirts don't shrink, or the transfers do not bleed through the fabric. Cut your white tee in half. I made sure to iron any wrinkles out, so as to have a smooth look with the steam OFF.
 After printing the decals out onto your heat transfer paper...using the mirror image function...lay them out on the heat bond to see how much you will need. 

 Lay the heat bond stick'em side down on the inside of the tee, and iron in place. Let cool.
 Lay your decal face down and trace around the edges on the heat bond backing. I turned the decal face down so that I wouldn't accidentally draw on the decal:o) Cut around the edges.
 And it should look a little something like this.
 Now get your red tee. Pull the backing off of the heat bonded circle.
 Center it on the tee with the stick'em side down.
 Now lay your decal over the circle making sure that the letters are lined up and not tilted to the side.
Iron for about 45 seconds, making sure to press down hard. The instructions on the transfers say to NOT use an ironing board. I laid some scrap fabric under the tee to give it a little cushion. 
 Let the shirt sit for 2 minutes and then remove the backing. For added stability, I sewed around the black line.
 And there you have it:o) Very easy, and very Universal Studios ready
If you would like to make these cute shirts just click below to download the files!!
&


Tuesday, August 2, 2011

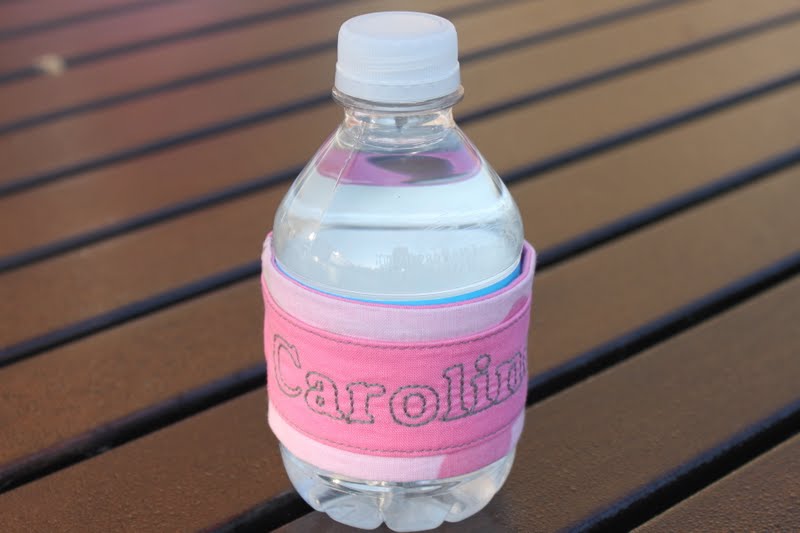
Kid's Reversible Water Cozy

Today we have a guest post from Jessica at This Too. She has a great back to school tutorial to share with us....Take it away Jessica!


Thank you Crystal for having me here on Fussy Monkey Business!

Hello, Everyone!  I'm Jessica from This Too! - a little place where I try to document my crazy dreamed up projects and ideas while taking care of my husband and my 5 kids.  I love to sew, craft and I'm starting to dabble in woodworking, too.  Thankfully, my husband is very understanding of my need to create.

When Crystal asked for me to contribute to her blog with a tutorial for 'Back-to-School', I really had trouble coming up with something new to share with y'all.  I tried to think of something that would be useful for my own little ones.  I must confess, though, my 'back-to-school' consists of buying whatever is on the supply list provided by the school and then send them out the door to meet the bus on the first day.  (Sentimental, ain't  I?)  However, there were several times last year when one or both of the school age kids came home complaining about someone else drinking out of their water bottle.  Now, we could all just whip out that Sharpie and write in big black letters all over the bottle, but what fun is that?!  Things need to be pretty-fied not simplified.  :)


What you need:
Fabric A:
1 piece - 6" x 2"
1 piece - 6" x 2 1/2"
2 pieces - 4 1/2" x 2 1/2"

Fabric B:
1 piece - 6" x 2"
1 piece - 6" x 2 1/2"

Elastic:
1 piece - 1" wide cut 2 1/2" long

Ball Point Sewing Machine Needle  (needed later on in the tutorial)

You will also need your usual sewing notions, iron, sewing machine, pins, etc.

Let's get started.

First things first - if you decide to do some machine embroidery to decorate your bottle cosy, you might want to do that prior to cutting your fabric.  I think this was the second time I've actually used the embroidery setting on my machine, so I am nowhere good enough to use a small piece of fabric in the hoop.  If you are doing the decorating by hand, feel free to add it whenever it is easiest for you.

Here is mine.

Once you have your pieces cut, take the 6"x2" fabric pieces of both fabric A and fabric B and iron down 1/2" on both sides (lengthwise) of both fabrics.  (Ignore the stabilizing material you see below.)
Next, pin these pieces down in the middle of your 6" x 2 1/2" pieces of contrasting fabric.  (A to B and B to A)  Do a top stitch along both lengths right at the edge of your center fabric.  If you click on the picture below, you can see mine just at the edges.

Put right sides together and stitch along one length using a 1/4" seam allowance.  Then open and press the seam to one side.
Turn your fabric over and press the ends down about 1/4".  (This will make your job easier in a couple of steps.)
Now, put right sides together (again) and stitch down the other length and turn right side out.  Go ahead and press the seams and edges under really good at this point.
Okay.  Now grab those 2 pieces of 4 1/2" x 2 1/2" fabric.  Pin them right sides together and stitch down both lengths.
Turn this right side out,  press the seams and add a top stitch down the seams for a little decoration and to help it stay looking nice.
Now is the time to change your machine needle to a Ball Point Needle.  If you don't, you could end up with some really hairy looking stitching on your bobbin side.  Not Pretty!

Take your little piece of elastic and stick it in the middle of the little tube you just created.  Line it up with one end and place it in the middle.  Stitch this end closed making sure you stitch through the elastic.
Flip it around and do the same thing on the other end.  (The fabric will need to be scrunched down.)
Now, slip one end of your fabric covered elastic piece (until the seam is covered) and stitch it in place.  This is a lot of fabric to put through the machine, so take your time and work it through.  

 Once that is done, stitch the other end just like the first.  It's a tight fit, so once again, take your time.
And there you have it!  One bottle cozy to put on your little one's water for snack time or lunch.  Now no one will be able to say they don't know who that bottle belongs to!

And don't forget, we made it reversible!


Hope you all have enjoyed this.  If you have ANY questions, please feel free to email me.

Once again - Thank you, Crystal, for letting me crash your blog!  And to all you readers out there, come on over and have a look around This Too!.  I would love to have you!

Monday, August 1, 2011

The Business August 3rd 2011, "Lest Ye Be Erin Judge" Edition

This week the Business regains it steadfast foundation of all four Businessmen Chris, Alex, Bucky and Sean while welcoming Comedian Erin Judge all the way from Brooklyn, New York. Erin Judge describes herself as "a comedian, writer, and caffeine enthusiast" who has been featured on Comedy Central's Live at Gotham and praised by Vanity Fair and Time Out New York. She is in town for the very funny Girl Talk show at the SF Punch Line (run by friends of the Biz Emily Heller and Janine Brito) and we are lucky enough to snag her here for a night at The Dark Room.

As you may know the show is but a mere $5, starts at a mere 8pm and is located a mere street-widths away from fine burritos and tallboys.


FCC Moves to Give Viewers Choice and Provide More Competition on Cable Systems

The U.S. Federal Communications Commission has adopted rules designed to halt cable system operators from retaliating against independent channels when there are business disputes or discriminating against them in favor of ones in which they ownership stakes.

The rules are intended to ensure that the monopoly power of cable operators is not used to deny viewer choice or harm competition channel providers.

One rule is designed to prohibit systems from dropping channels when there are business disputes with systems that have been taken to the commission for resolution.

Another rule is designed to create a more level playing field for independent channels by making it possible for them to reach more viewers. Comcast Corp., for example, has been accused in recent years of forcing competitors’ sports channels into premium packages that fewer viewers select.

Given that price rises for cable services have far outstripped inflation rates in recent years, that service providers create bundles of channels that primarily serve their benefits rather customers, and that consumers continually express dissatisfaction with choices, prices, and customer service provided, it is not surprising that the commission decided to act to slightly limit the power of the major players.

The big cable players are livid about the rules, of course, and can be expected to be highly active in the next regulatory stage seeking comments on how to implement the rules.

At this point they and they supporters are complaining that keeping channels on the air while dispute resolution is underway is somehow unfair to them. The system operators, of course, refuse to recognize how it is particularly unfair to customers who have no way to influence the decision.

Summer Canning and Freezing

Last week I headed up to my parents to do some canning and "putting up" vegetables.
I did more "putting up" than canning....my mother is the pro at that!!!
I don't have a garden right now, but next year we will....
I really want to have some chickens to lay eggs too, but I'm not sure if I can get away with it in my neighborhood:o) We have the space to do it though!
When I need to buy in bulk, I go to the Mennonites and purchase their delicious produce.
We pack up and leave early in the morning so that we can be the first ones to buy....it's a first come first serve basis.
This year, I got corn, green beans, squash, cucumbers, and peaches from them.
I was extremely lucky to get the green beans because there hasn't been enough rain in that area for them to grow well.
So here is my "canned" stash. I still have a few more things to add to the stash like pintos....and by the way, yes, we love pickles:o)
 Here is some okra that came from my grandmother's garden....still trying to decide whether to pickle it or freeze it.
 Earlier in the summer I made this strawberry jam....It is DIVINE:o)
My kids won't touch it for whatever reason, so it's all MINE!!!!!!!
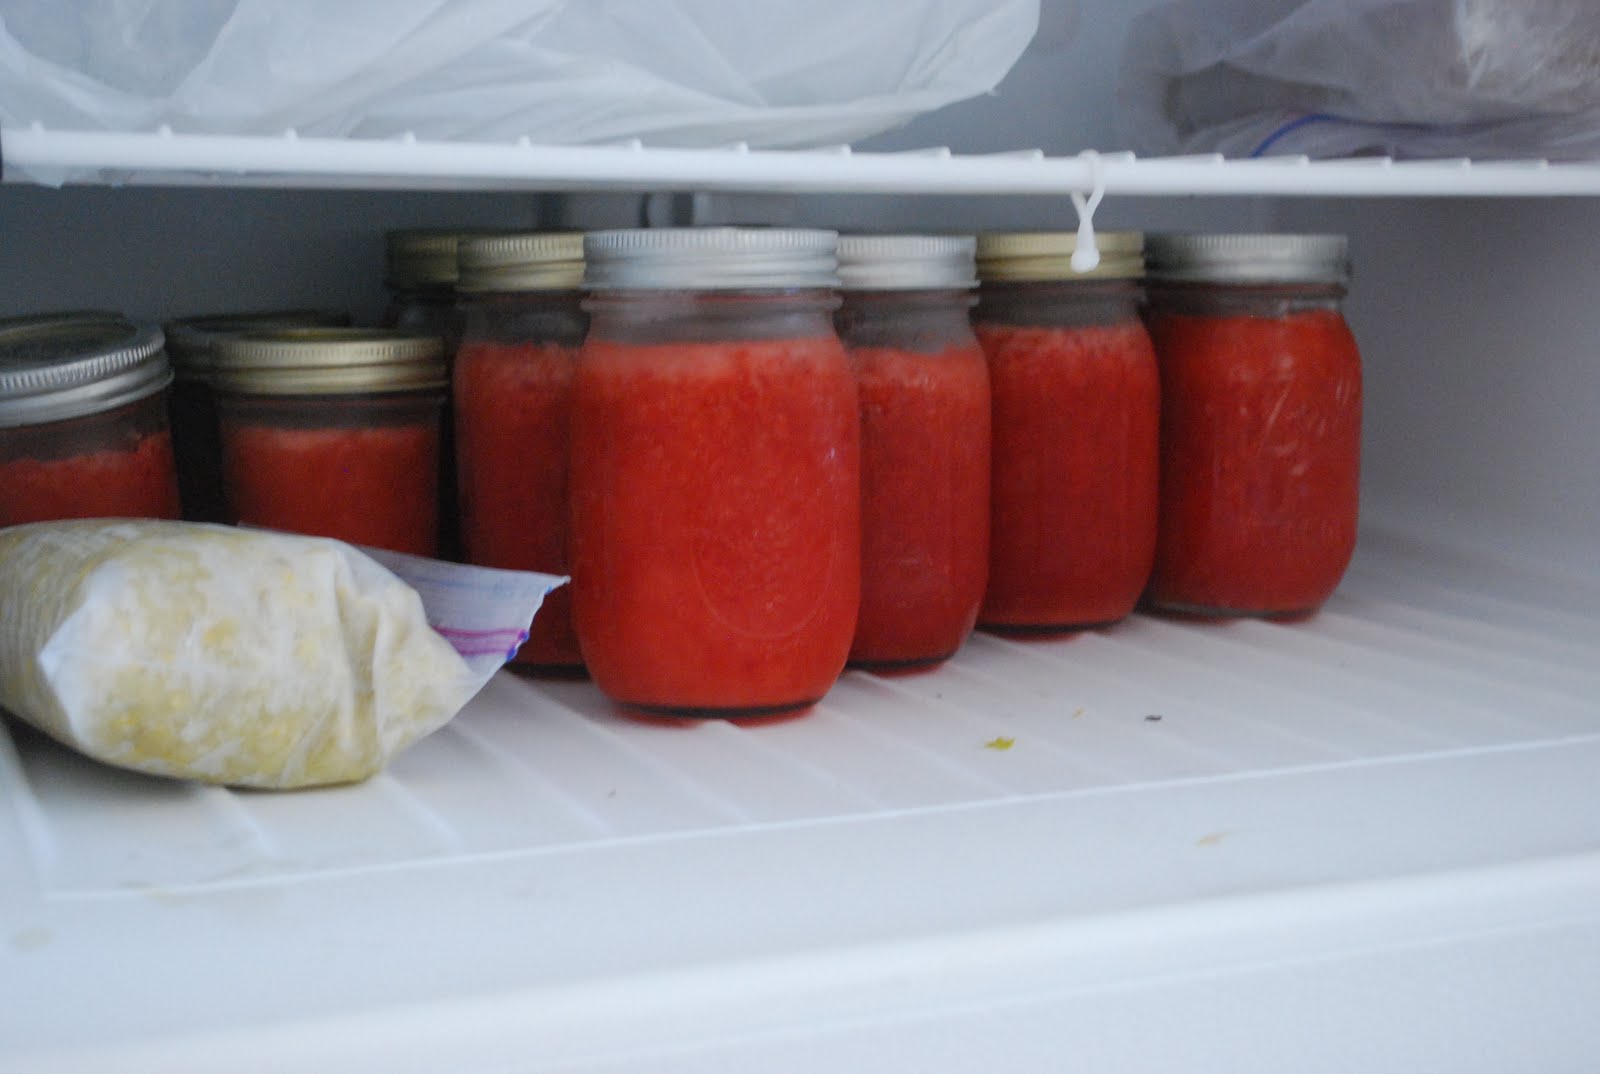
 This is the contents of our chest freezer. It's full of corn and squash mostly. There are 12 quarts of peaches in there as well.
 Here's how big the freezer is. It's small, but big enough to hold for this family of four.
I had a lot of help from my parents! Shucking, peeling, cooking, canning, and everything that comes with putting up veggies. We had a good time, and now we are exhausted. Every time I do anything like this I am reminded of The Ant and the Grasshopper story:o)
I'm going to share some tricks here soon on canning, but I am not sure when I will get around to it. We have a lot going on these next two weeks. I am going to have some guest posts this week and next week. So make sure to stay tuned!