Showing posts with label tutorial. Show all posts

Wednesday, August 21, 2013

Burlap Wreath Tutorial

I.am.ready.for.fall.
Since Fall is around the corner, and I have a few spare moments with the kiddos back in school, I have been able to catch up on some decor projects I have been wanting to tackle.
One of them being a burlap wreath. 
You can't have Fall without a burlap wreath. It's in the rule books somewhere...I'm sure of it. 
There are so many different styles. Raggedy, bubbly, smooth, etc. I went for more of a shabby look...sounds better than raggedy, right?
Today I'm sharing how quick and easy this project is.  
Your list of supplies:
3 yards of burlap(I used two colors)(Burlap is $3.99 at my Hobby Lobby. I used a 40% off Q)
Wire hanger(Joan Crawford would die)
Needle Nose pliers
Scissors
Tape Measure
Start off by cutting your strips. I cut mine at 5" wide.
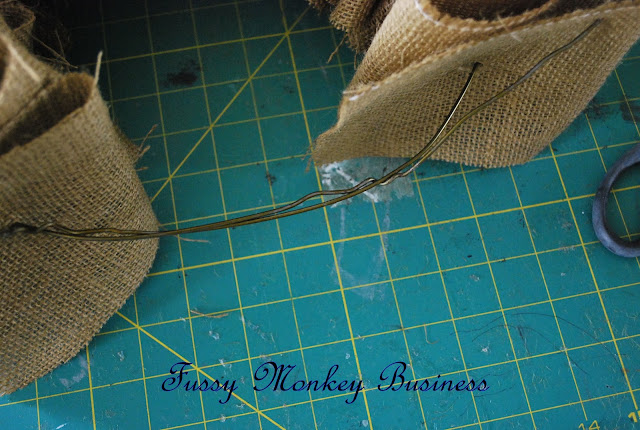
Then you will want to straighten out the wire hanger.
 Once all of the burlap is cut, do a fan fold. When finished, you will roughly have a 5x5 square.
Thread the wire hanger through the square. 
 While threading, the wire hanger was flopping around. This was driving Max bananas..it was fun to watch;o)
After all of the burlap is threaded onto the hanger, twist the ends together. I ended up snipping about 3" off of each side.
Twist it all together as best you can.
Flip, and hang on a wreath stand.
This project took less than an hour from start to finish, and was less than $10. Easy peasy. I'll have some more step by step fall decor coming your way soon!


Tuesday, August 20, 2013

Drawer-Turned-Bathroom Shelf

School is back in session here, so I actually have time to sit down and do some posts. I realized today that there are several projects that I talked about on Facebook, but never posted about them, so I 'm going to have to get with it:o)
Speaking of Facebook, the LEGO Table has been unbelievably popular. Y'all have been blowin' up my feed! It's already more popular than my Menu Board...cuh-razy!
So today is all about this cute little shelf that's hanging in our newly remodeled half bath.
This is where I started. I found this drawer, along with another on the side of the road when I was on my way to drop S.R. off for preschool last year. The hubs wasn't happy about it, so to the attic it went and sat for over a year. 
I've seen a lot of drawer-to-shelf makeovers here lately but I really didn't know where I would put one until I was in need of a shelf for the bathroom. Awesome!
 I was not about to sand this piece down because I didn't know what kind of paint was on the drawer, nor did I know how many coats there were....now I do..there were 4 coats people! Yowza!
I used a paint stripper that I purchased from Lowes. I have never used it before, and even though the directions said WEAR A MASK,  I didn't listen. If you're going to use paint stripper, WEAR A MASK! The fumes are horrendous, and you feel like you're lungs are on fire. I thought that by having the garage doors open, that it would provide plenty of ventilation...um, that would be a big fat NO.
So, lesson learned.
 This stuff worked pretty quickly, thankfully. 
 What are those dark spots inside the drawer? Mashed bugs...gross, I know, but I figured if this stuff could strip paint, it would definitely strip a dead bug...and it did;o)
 My original intent for this shelf was to spray paint it after getting the paint off, but after applying two different coats of the paint stripper, I decided that I really liked the way the older colors were popping through. I gave it a light sanding, and then had the hubs add the shelf because I was having a time with getting it level. I spray painted the shelf white, and distressed it a bit for attaching it to the drawer.
I found the robe hook at Walmart and the hubs added that as well.
This is such a neat shelf, and adds a lot of character to this small space.
So who's going to go dumpster diving and find themselves an old drawer? If you decide to take on this project, I would love to see how yours turned out!

Partying Here:


Thursday, August 4, 2011

Dr. Seuss' Thing 1 & Thing 2 Shirts

We are headed to Florida soon for a vacation, and we have decided to visit Universal Studios this year. We have been to Disney the past 2 years, and the hubs and I are kinda wanting to mix things up a bit. The kids have no idea we are going there. They think it's JUST a beach trip...:o)
 If you have been following me for a while, you know that I did a whole ensemble for the kids to wear to Disney.
To see those outfits, you can go HereHereHere, &  Here.
We are planning to go to Universal  for only 2 days, so I only need 2 outfits:o)
Here is the first matching outfit:
To make these super easy and super cute shirts, here is a list of supplies you will need:
Red t-shirt
White tee or white stretchy fabric
Light Fabric Transfers(found at any craft store or Walmart)
Heat Bond...I prefer the kind that you can sew on.
scissors
iron
thread 
sewing machine
 Start out by washing and drying your tees. That is to ensure that your shirts don't shrink, or the transfers do not bleed through the fabric. Cut your white tee in half. I made sure to iron any wrinkles out, so as to have a smooth look with the steam OFF.
 After printing the decals out onto your heat transfer paper...using the mirror image function...lay them out on the heat bond to see how much you will need. 

 Lay the heat bond stick'em side down on the inside of the tee, and iron in place. Let cool.
 Lay your decal face down and trace around the edges on the heat bond backing. I turned the decal face down so that I wouldn't accidentally draw on the decal:o) Cut around the edges.
 And it should look a little something like this.
 Now get your red tee. Pull the backing off of the heat bonded circle.
 Center it on the tee with the stick'em side down.
 Now lay your decal over the circle making sure that the letters are lined up and not tilted to the side.
Iron for about 45 seconds, making sure to press down hard. The instructions on the transfers say to NOT use an ironing board. I laid some scrap fabric under the tee to give it a little cushion. 
 Let the shirt sit for 2 minutes and then remove the backing. For added stability, I sewed around the black line.
 And there you have it:o) Very easy, and very Universal Studios ready
If you would like to make these cute shirts just click below to download the files!!
and


Dr. Seuss' Thing 1 & Thing 2 Shirts

We are headed to Florida soon for a vacation, and we have decided to visit Universal Studios this year. We have been to Disney the past 2 years, and the hubs and I are kinda wanting to mix things up a bit. The kids have no idea we are going there. They think it's JUST a beach trip...:o)
 If you have been following me for a while, you know that I did a whole ensemble for the kids to wear to Disney.
To see those outfits, you can go HereHereHere, &  Here.
We are planning to go to Universal  for only 2 days, so I only need 2 outfits:o)
Here is the first matching outfit:
To make these super easy and super cute shirts, here is a list of supplies you will need:
Red t-shirt
White tee or white stretchy fabric
Light Fabric Transfers(found at any craft store or Walmart)
Heat Bond...I prefer the kind that you can sew on.
scissors
iron
thread 
sewing machine
 Start out by washing and drying your tees. That is to ensure that your shirts don't shrink, or the transfers do not bleed through the fabric. Cut your white tee in half. I made sure to iron any wrinkles out, so as to have a smooth look with the steam OFF.
 After printing the decals out onto your heat transfer paper...using the mirror image function...lay them out on the heat bond to see how much you will need. 

 Lay the heat bond stick'em side down on the inside of the tee, and iron in place. Let cool.
 Lay your decal face down and trace around the edges on the heat bond backing. I turned the decal face down so that I wouldn't accidentally draw on the decal:o) Cut around the edges.
 And it should look a little something like this.
 Now get your red tee. Pull the backing off of the heat bonded circle.
 Center it on the tee with the stick'em side down.
 Now lay your decal over the circle making sure that the letters are lined up and not tilted to the side.
Iron for about 45 seconds, making sure to press down hard. The instructions on the transfers say to NOT use an ironing board. I laid some scrap fabric under the tee to give it a little cushion. 
 Let the shirt sit for 2 minutes and then remove the backing. For added stability, I sewed around the black line.
 And there you have it:o) Very easy, and very Universal Studios ready
If you would like to make these cute shirts just click below to download the files!!
&


Sunday, May 8, 2011

Pottery Barn's Hadley Ruched Duvet Knock Off

I hope that you all had a wonderful Mother's Day.  S.R. has a sinus infection right now, so things have been a little off kilter around here.
I still haven't been able to use my chalk paint yet, but I am really looking forward to it:o)
 I did get the chance to finish a project that I have been working on.
A couple of weeks ago the Pottery Barn catalog came in the mail. I always get excited when those things come because they have so many beautiful things in them. 
When I saw the Hadley Ruched Duvet Cover, I wanted it....badly. Isn't it beautiful?
Photo Credit: Pottery Barn
I really wanted it for MY bed, but the hubs and the color white aren't on good terms, so I knew that having it in our room was a no-go:o/ The guest room needs a makeover, so I decided to put it there.
I knew that this was something that I could make. Pottery Barn sells this duvet cover for $179.00. That's just the cover...if you don't have a duvet, then there is another added cost. So after studying the picture for a few days, I figured it out, and I was able to make mine for $75...that's INCLUDING the purchase of a duvet($24.99 King Size at Target):o)
Here's mine:
Want to know how I did it?
Here's what you need:
3 King size Flat sheets(this is for a queen bed)-$15 each at Walmart
4 or 5 packs of 1" wide Twill tape- around a $1 each...I think...(you could also use bias tape here)
White thread
Pins
Scissors

To begin.....
Wash and dry all 3 sheets.  
Cut the tops of the sheets off.
See picture:

Take 2 sheets and stitch cut ends together. Press open seam. 

This next part was a tad tricky for me in the beginning. I thought I would try to measure everything out to figure where I needed to have the long baste stitch lines, but it proved to be more of a hassle, sooooo

I folded the sheet in quarters lengthwise(in half, then halvsies again) and stretched it down the hallway to make sure that everything was folded correctly and smoothly. 
Press down all of the edges with a HOT iron using your steam. These lines will be your guide for your stitch lines.
Head to your machine, and use a basting stitch the entire length of the sheet. You will do this 5 times. 3 for the interior lines and 1 vertical line on either side of the outer edges.
You will be covered in fabric:o)
Once all of your lines have been sewn, you will need to start gathering. Find the little string on the end and start pulling. This takes FO-EVUH because you have to be careful not to break the string.
Lay it across the 3rd sheet and make all edges match up with the bottom sheet. You want to try to keep all of the gathers even.


Get your twill tape out and start pinning it across your stitch lines. Make sure to get your pins fairly close so that the gathers will not loosen when you pick up the top.
Stitch the twill tape down one side and them the other side.
Lay your finished top back on the 3rd sheet face down. Pin around the perimeter.

Make sure to leave a gap so that you will be able to insert your duvet later.
Stitch the perimeter.
Turn right side out and insert duvet. Fold in edges of opening, pin, and stitch.
Then you are done:o)

Pottery Barn's version has button holes for easy removal, but since this bed will not be used a lot, I am not worried about removing the duvet.

This project is fairly simple, but can be daunting with the amount of fabric you have to deal with.
I would say this project is for intermediate to advanced sewers.

So what do you think?

Is it a keeper?
It's totally girly:o)
It just needs some really cute pillows to match....thinking those will be purchased;o)

So again here's the comparison.

Mine:


And Pottery Barn's

I think it's a keeper;o) And it saved me a whopping $129(not including the purchase of the duvet)!

This Project has been featured here:


Photobucket


kimbo's crafts


UndertheTableandDreaming


Participating in these linky parties:


Passionately Artistic
UndertheTableandDreaming

Visit thecsiproject.com